概述
第一台nas系统记录,其实没什么需要,就是想要。
本文缺图流,有个私有博客,服务器图床空间不大。
硬件
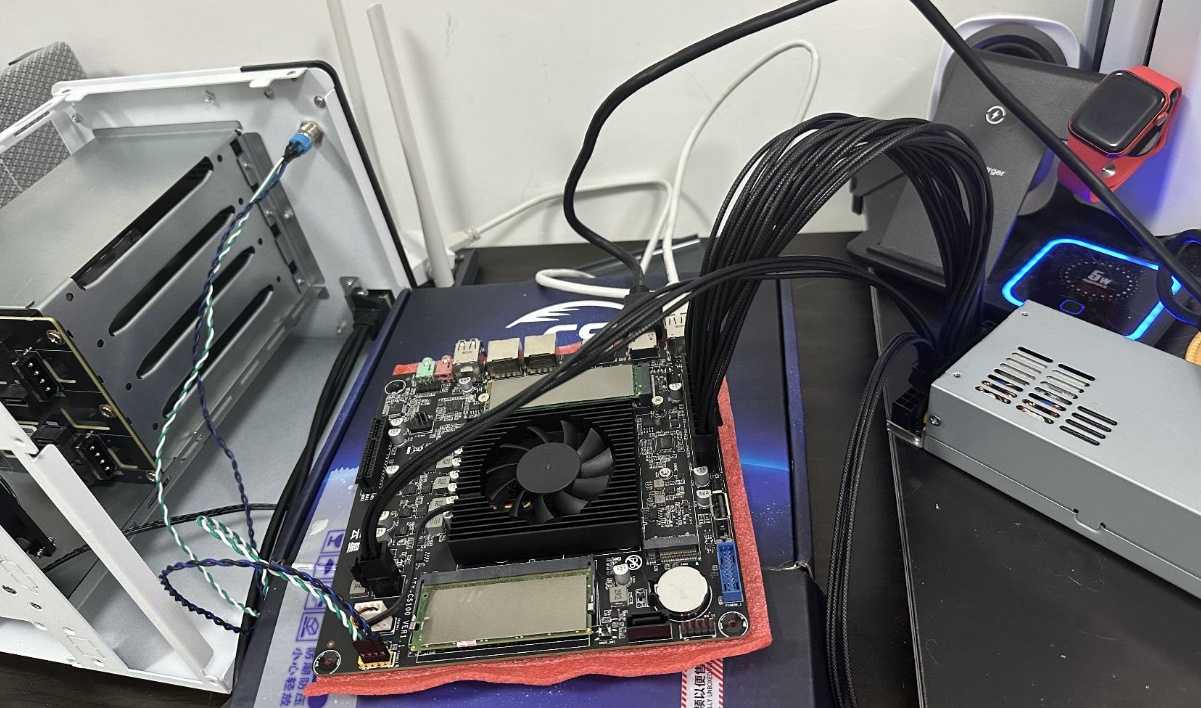
- 我挑选了一块 云星的N100 主板,板U一体,还送CPU风扇。【淘宝549¥】
主要是N100是23年的CPU,其他选择都是老二手CPU,包括主板的挑选担心踩坑,并且作为程序员万一就瞎折腾呢,CPU好一点问题也不大。
- 根据这块主板,购买了 佳翼 JMB585 【淘宝¥99】作为 m.2 转 5 sata口,后续连接硬盘柜。牌子随意,之前搜固态硬盘盒评测的时候看到过这个牌子,感觉比无牌靠谱一点,也没差多少钱。
- 电源我选择了 优易科技的 益衡 Flex 电源【淘宝¥267】。在B站看Flex电源评测关注到这个,然后找到了淘宝店,看重的是它的运行声音,实际运行也基本没声音。电源可不敢省钱买那些70的。
- 机箱买的是梵隆的4盘位 nas机箱【¥269+快递9¥】其他的都太贵了500+。机箱希望小一点,便宜一点,其他无所谓。
总价:【¥1183】
其他硬件,从老电脑薅下来的 D4 16G 内存条,512G 上古 m.2 固态,1T 笔记本机械盘。以前装电脑多出来的sata线若干。
关于这个组合
- 电源和主板供电线感觉不是很紧。JMB585接sata感觉没有想象中的紧。
- 电源是全模组,线材很结实,在机箱内走线挺极限的。安装的时候调线,某些松的线掉了,比如主板24pin供电,但是装好后不动他其实还是挺结实的。
- 这个机箱后面板IO接口挡板不知道怎么装,感觉是靠蛮力卡进去,空间又小,又担心24pin供电松了,最后不装了。
- 这个机箱硬盘柜是两个大4pin供电,4个sata接口。注意给卡扣打开的状态按倒底,在按上卡扣。因为这个识别不到机械硬盘调试半天。
在安装完成所有东西和测试后就装起来了。不大的一个方盒子,机箱挺重的。

安装PVE
安装系统
参考教程
https://www.bilibili.com/video/BV1bc411v7A3/?spm_id_from=333.337.search-card.all.click
https://post.smzdm.com/p/agqw24zw/
-
下载镜像
- https://www.proxmox.com/en/downloads
- Proxmox VE 8.2 ISO Installer
-
下载启动盘制作
- https://rufus.ie/downloads/
- rufus-4.6.exe 。选择镜像,U盘,启动。没啥好说的
找店家要主板说明U盘启动是F11
https://post.smzdm.com/p/agqw24zw/
都是图形化界面。几个需要注意的地方
- 密码要记住,后面登录用,账号root,密码是这个
- 网络设置
enp代表是的一个网络接口,我的主板上有两个。
路由器一条网线插这里,另一条插另一台主windows电脑。后面可以在windows登入下面这个 IP Address 的进入PVE web端管理。
Gateway 教程中装OpenWRT 可是我在官网下载的版本看起来界面好凑,就先当没有把。反正IP先填着。
后面基本都是默认即可
一顿操作后
拔出U盘重启
界面显示 login 和 一个 192.168.22.11:8006 就为OK
远程登入
我的windows插着网线,同时还连着wifi。
路由器网线一条连windows,另一条连nas主机刚刚设置的网口。
网络IPv4 设置。给win写一个同网段IP地址,默认网关写nas的IP地址
浏览器访问 192.168.22.11:8006 输入密码登入成功。
后来因为小米路由器是 192.168.31.1 我把PVE改成 192.168.31.x 不需要IP设置也能连上去了。
外网连接PVE就别了。NAS系统开外网就行了
合并 local-lvm 空间给local
root@cwlnas:~# lvremove pve/data
Do you really want to remove active logical volume pve/data? [y/n]: y
  Logical volume "data" successfully removed.
root@cwlnas:~# lvextend -l +100%FREE -r pve/root
  Size of logical volume pve/root changed from 96.00 GiB (24576 extents) to <467.94 GiB (119792 extents).
  Logical volume pve/root successfully resized.
resize2fs 1.47.0 (5-Feb-2023)
Filesystem at /dev/mapper/pve-root is mounted on /; on-line resizing required
old_desc_blocks = 12, new_desc_blocks = 59
The filesystem on /dev/mapper/pve-root is now 122667008 (4k) blocks long.

root@cwlnas:~# resize2fs /dev/mapper/pve-root
resize2fs 1.47.0 (5-Feb-2023)
The filesystem is already 122667008 (4k) blocks long.  Nothing to do!

root@cwlnas:~#
不知道有什么用,可做可不做吧
然后 数据中心,存储,local-lvm 点击移除
挂载磁盘
其实就是linux的磁盘管理。我有一个1T的机械,要让PVE能识别到。后续再分配给nas系统
创建磁盘,挂载,设置开机挂载
root@cwlnas:~# fdisk /dev/sda

Welcome to fdisk (util-linux 2.38.1).
Changes will remain in memory only, until you decide to write them.
Be careful before using the write command.

Command (m for help): d
Selected partition 1
Partition 1 has been deleted.

Command (m for help): d
No partition is defined yet!

Command (m for help): n
Partition number (1-128, default 1):
First sector (34-1953525134, default 2048):
Last sector, +/-sectors or +/-size{K,M,G,T,P} (2048-1953525134, default 1953523711):

Created a new partition 1 of type 'Linux filesystem' and of size 931.5 GiB.
Partition #1 contains a vfat signature.

Do you want to remove the signature? [Y]es/[N]o: y

The signature will be removed by a write command.

Command (m for help):
All unwritten changes will be lost, do you really want to quit?

root@cwlnas:~# ls /dev/sd*
/dev/sda  /dev/sda1
root@cwlnas:~# mkfs -t ext4 /dev/sda1
mke2fs 1.47.0 (5-Feb-2023)
/dev/sda1 contains a ntfs file system labelled 'workspace'
Proceed anyway? (y,N) y
Discarding device blocks: done
Creating filesystem with 244186112 4k blocks and 61046784 inodes
Filesystem UUID: a9ccfe65-6639-43c4-b6f2-448bf1062fe9
Superblock backups stored on blocks:
        32768, 98304, 163840, 229376, 294912, 819200, 884736, 1605632, 2654208,
        4096000, 7962624, 11239424, 20480000, 23887872, 71663616, 78675968,
        102400000, 214990848

Allocating group tables: done
Writing inode tables: done
Creating journal (262144 blocks): done
Writing superblocks and filesystem accounting information: done

root@cwlnas:~# mkdir -p /mnt/sda1
root@cwlnas:~# echo /dev/sda1 /mnt/sda1 ext4 defaults 1 2 >> /etc/fstab
最后看一下
root@cwlnas:~# cat /etc/fstab
# <file system> <mount point> <type> <options> <dump> <pass>
/dev/pve/root / ext4 errors=remount-ro 0 1
UUID=DAB0-0782 /boot/efi vfat defaults 0 1
/dev/pve/swap none swap sw 0 0
proc /proc proc defaults 0 0
/dev/sda1 /mnt/sda1 ext4 defaults 1 2
后续有改PVE IP的需求
192.168.31.1 路由器
192.168.31.11 PVE
192.168.31.21 OpenWRT
root@cwlnas:~# cat /etc/network/interfaces
# network interface settings; autogenerated
# Please do NOT modify this file directly, unless you know what
# you're doing.
#
# If you want to manage parts of the network configuration manually,
# please utilize the 'source' or 'source-directory' directives to do
# so.
# PVE will preserve these directives, but will NOT read its network
# configuration from sourced files, so do not attempt to move any of
# the PVE managed interfaces into external files!

auto lo
iface lo inet loopback

iface enp2s0 inet manual

iface enp3s0 inet manual

auto vmbr0
iface vmbr0 inet static
        address 192.168.31.11/24
        gateway 192.168.31.21
        bridge-ports enp2s0
        bridge-stp off
        bridge-fd 0

auto vmbr1
iface vmbr1 inet manual
        bridge-ports enp3s0
        bridge-stp off
        bridge-fd 0

root@cwlnas:~# cat /etc/issue

------------------------------------------------------------------------------

Welcome to the Proxmox Virtual Environment. Please use your web browser to
configure this server - connect to:

  https://192.168.31.11:8006/

------------------------------------------------------------------------------
reboot一下
安装飞牛os
怎么就这么巧刚被极空间nas种草。然后了解了黑白群晖,绿联nas,DIY小主机自装NAS系统,同时飞牛OS刚刚公测。
综合了各种硬件软件条件,才选了这个组合。
- 白群晖贵,而且我的nas需求不是特别强烈。
- 黑群晖当然也考虑范围内,但是听说复杂且没有all in one app,而且是盗版流。不过我PVE打底,肯定是预备着有空就玩一下的。
- 其他国产成品nas,价格都比DIY高,而且系统貌似也不咋地,和免费的飞牛打的有来有回。
看官方教程把
PVE 傻瓜式上传镜像,然后好像就好了。
shell进去会看到浏览器管理地址。进系统
给飞牛加磁盘
在PVE中,添加磁盘,选择上面挂载磁盘那部分搞出来的sda1。有点就。
这时候进飞牛,创建存储空间就能用到这里的机械盘了。
第一次用这个文件管理还有点奇怪
可以理解为,
- 每一个用户有一个 个人文件夹,这块空间是虚拟的。有点像 /home/username
- 用户文件夹下的文件夹在创建的时候可以绑定一个存储空间(对应实际的硬盘)。
- 而在管理员视角看这堆盘的结构(物理结构)是根目录下一堆用户名,每个用户名是每个用户的文件夹。
公网访问
https://www.bilibili.com/video/BV1bA4m1N7Zq/?spm_id_from=333.337.search-card.all.click
没有公网IPv4,宽带不支持IPv6,搞内网穿透吧
如果公网服务器把转发端口设置在8000,那么飞牛APP也可以登入的上。
IOS APP好像不能改8000端口?
装OpenWRT
本来是想做那个功能。最后安装应该是ok的,但是这个官网下载的web管理端比视频里面的简陋是怎么回事。直接删了。PVE实在是太方便了。
但是还是有一些地方需要记录一下的。
下载openwrt
generic-ext4-combined-efi.img.gz
一个img文件,需要转qcow2
传到服务器,mobaXterm ssh连接拖过去,或者ftp自己处理
然后用,转一下格式
qemu-img convert -O qcow2 test.img test.qcow2root@cwlnas:~# ls
openwrt.img
root@cwlnas:~# qemu-img
qemu-img: Not enough arguments
Try 'qemu-img --help' for more information
root@cwlnas:~# qemu-img convert -O qcow2 openwrt.img openwrt.qcow2
root@cwlnas:~# ls
openwrt.img openwrt.qcow2
root@cwlnas:~#
创建一个无镜像的虚拟系统。创建完成后会在tab栏目标一个数字比如100
然后再用命令行把这个镜像挂载
root@cwlnas:~# qm importdisk 100 openwrt.qcow2 local
importing disk 'openwrt.qcow2' to VM 100 ...
Formatting '/var/lib/vz/images/100/vm-100-disk-1.raw', fmt=raw size=126123520 preallocation=off
transferred 0.0 B of 120.3 MiB (0.00%)
transferred 10.2 MiB of 120.3 MiB (8.44%)
transferred 20.3 MiB of 120.3 MiB (16.89%)
transferred 30.5 MiB of 120.3 MiB (25.33%)
transferred 32.7 MiB of 120.3 MiB (27.18%)
transferred 34.9 MiB of 120.3 MiB (29.02%)
transferred 45.4 MiB of 120.3 MiB (37.73%)
transferred 55.5 MiB of 120.3 MiB (46.17%)
transferred 65.7 MiB of 120.3 MiB (54.62%)
transferred 75.8 MiB of 120.3 MiB (63.06%)
transferred 86.0 MiB of 120.3 MiB (71.50%)
transferred 96.2 MiB of 120.3 MiB (79.95%)
transferred 106.3 MiB of 120.3 MiB (88.39%)
transferred 116.5 MiB of 120.3 MiB (96.83%)
transferred 120.3 MiB of 120.3 MiB (100.00%)
transferred 120.3 MiB of 120.3 MiB (100.00%)
Successfully imported disk as 'unused0:local:100/vm-100-disk-1.raw'
这时候100,硬件,会出现未使用的磁盘
双击,添加,出现系统盘
启动顺序,把这个100勾上,挪到最上面
100虚拟机的控制台,点击启动,然后开始跑进度条
这个进度条看起来卡住了,要敲一下回车。。。
改IP
vim /etc/config/network
找到config interface 的 option ipaddr 改成192.168.22.1
保存
reboot 重启系统
一段代码后,自己敲一下回车。
pve控制台选项 开机自启打开,这样openWRT 机会和 pve一起启动了
root@cwlnas:~# cat /etc/network/interfaces
# network interface settings; autogenerated
# Please do NOT modify this file directly, unless you know what
# you're doing.
#
# If you want to manage parts of the network configuration manually,
# please utilize the 'source' or 'source-directory' directives to do
# so.
# PVE will preserve these directives, but will NOT read its network
# configuration from sourced files, so do not attempt to move any of
# the PVE managed interfaces into external files!

auto lo
iface lo inet loopback

iface enp2s0 inet manual

iface enp3s0 inet manual

auto vmbr0
iface vmbr0 inet static
        address 192.168.31.11/24
        gateway 192.168.31.21
        bridge-ports enp2s0
        bridge-stp off
        bridge-fd 0

auto vmbr1
iface vmbr1 inet manual
        bridge-ports enp3s0
        bridge-stp off
        bridge-fd 0

root@cwlnas:~# cat /etc/issue

------------------------------------------------------------------------------

Welcome to the Proxmox Virtual Environment. Please use your web browser to
configure this server - connect to:

  https://192.168.31.11:8006/

------------------------------------------------------------------------------