我使用的动画资源。其实第一个就够

攀爬状态
- 打开角色运动组件,里面有一个默认陆地行走模式。改成custom自定义,然后再配合空的动画蓝图。运行后会发现角色动不了了。因为这里没有任何流程代码。
- 我们可以认为这个Custom状态就是现在的攀爬状态。
所以我们需要一个接口,进入和退出攀爬状态,就是设置上面的CharacterMovement 进入 MOVE_Custom 和 MOVE_Walking
void UCwlClimbComponent::StartClimb()
{
    SetClimbState(MOVE_Custom);
}

void UCwlClimbComponent::StopClimb()
{
    SetClimbState(MOVE_Walking);
}

void UCwlClimbComponent::SetClimbState(EMovementMode InMode)
{
    if (!IsComponentReady())
    {
        return;
    }
    OwnerMovement->SetMovementMode(InMode);
}
同时,角色运动发生变化时候会回调OnMovementModeChanged,修改我们自己维护一个变量运动状态为攀爬,作为动画切换的条件
void ACwlCharacter::OnMovementModeChanged(EMovementMode PrevMovementMode, uint8 PreviousCustomMode)
{
    Super::OnMovementModeChanged(PrevMovementMode, PreviousCustomMode);

    if (EMovementMode MovementMode = this->GetCharacterMovement()->MovementMode.GetValue();
        MovementMode == EMovementMode::MOVE_None || MovementMode == EMovementMode::MOVE_Walking || MovementMode == EMovementMode::MOVE_NavWalking)
    {
        SetMovementState(ECwlMovementState::Grounded);
    }

    // ...

    else if (MovementMode == EMovementMode::MOVE_Custom)
    {
        SetMovementState(ECwlMovementState::Climbing);
    }
}
并且我把攀爬状态塞在了ALSv4的MainMovementState这一层,右下角
射线检测进入攀爬状态
如何进入攀爬状态,可以敲上面的函数测试。一般都是射线检测,看过很多个版本,怎么写的都有,能用就行。
一种方案是,在组件tick里面进行三条射线检测。
    FHitResult HitResultHighLevel, HitResultLowLevel, HitResultGround;
    float HighLevelTraceDistance = LineTraceForwardHighLevel(HitResultHighLevel);  // 头顶
    float LowLevelTraceDistance = LineTraceForwardLowLevel(HitResultLowLevel);  // 腿部
    float GroundTraceDistance = LineTraceDownFromFoot(HitResultGround);
    const float ClimbTraceDistance = OwnerCapsuleComponent->GetScaledCapsuleRadius() * 1.5f;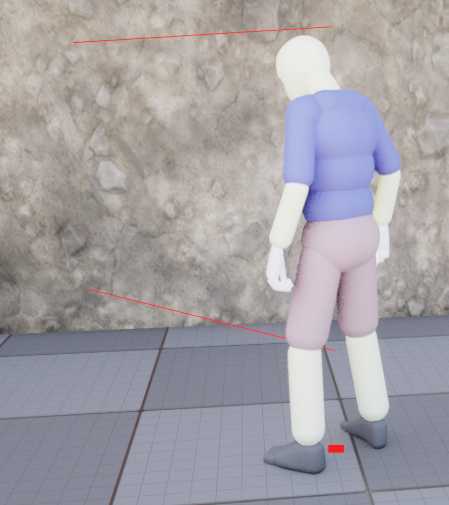
- 头顶一条向前的射线,膝盖位置一条向前的射线。用于检测墙面。
- 如果膝盖检测到了,头顶没有检测到。那就是爬到顶了。
- 如果头顶检测到,膝盖没检测到,下面没得东西爬。
- 角色向下一条射线
- 如果在很短的距离内检测到了地面,那就是要落地了。
于是我们写出这样的代码 tick 中
ECwlClimbState 有 Climb 和 None 两个值,用于攀爬状态中的多种子状态的描述
void UCwlClimbComponent::UpdateClimbState(float Deltatime)
{
    if (!IsComponentReady())
    {
        return;
    }

    FHitResult HitResultHighLevel, HitResultLowLevel, HitResultGround;
    float HighLevelTraceDistance = LineTraceForwardHighLevel(HitResultHighLevel);  // 头顶
    float LowLevelTraceDistance = LineTraceForwardLowLevel(HitResultLowLevel);  // 腿部
    float GroundTraceDistance = LineTraceDownFromFoot(HitResultGround);
    const float ClimbTraceDistance = OwnerCapsuleComponent->GetScaledCapsuleRadius() * 1.5f;

    if (HitResultHighLevel.bBlockingHit && HitResultLowLevel.bBlockingHit)
    {
        if (LowLevelTraceDistance <= ClimbTraceDistance)
        {
            if (ClimbState == ECwlClimbState::Climb)
            {
                if (HitResultGround.bBlockingHit && GroundTraceDistance <= 2.f)
                {
                    StopClimb();
                }
            }
            else
            {
                ClimbState = ECwlClimbState::Climb;
                StartClimb();
            }
        }
    }
    else if (HitResultLowLevel.bBlockingHit && !HitResultHighLevel.bBlockingHit)
    {
        // 爬到顶了
    }
    else
    {
        if (ClimbState == ECwlClimbState::Climb)
        {
            ClimbState = ECwlClimbState::None;
            StopClimb();
        }
    }
}
攀爬输入

给攀爬状态机输出一个简单的动画。这样可以上墙了,但是发现移动不了。
处理输入
void ACwlBasePlayer::Move(const FInputActionValue& Value)
{
    FVector2D MovementVector = Value.Get<FVector2D>();
    if (Controller != nullptr)
    {
        // ...
        else if (GetMovementState() == ECwlMovementState::Climbing)
        {
            ClimbComponent->Move(OutForwardAxis, OutRightAxis);
        }
        // ...
    }
}
想象一下,你趴在墙上,WS控制的角色垂直上下,AD控制左右。调用到 AddMovementInput
void UCwlClimbComponent::Move(float ForwardAxis, float RightAxis)
{
    if (!IsComponentReady())
    {
        return;
    }

    const FRotator Rotation = OwnerCharacter->GetActorRotation();
    const FRotator ForwardYawRotation(Rotation.Pitch, Rotation.Yaw, 0.f);
    const FVector ForwardDirection = FRotationMatrix(ForwardYawRotation).GetUnitAxis(EAxis::Z);
    OwnerCharacter->AddMovementInput(ForwardDirection, ForwardAxis);

    const FRotator RightYawRotation(0, Rotation.Yaw, 0);
    const FVector RightDirection = FRotationMatrix(RightYawRotation).GetUnitAxis(EAxis::Y);
    OwnerCharacter->AddMovementInput(RightDirection, RightAxis);
}
还是动不了
因为虚幻更新移动的PhysXXX 中,PhysCustom 没帮我们写呀
void UCharacterMovementComponent::StartNewPhysics(float deltaTime, int32 Iterations)
{
    if ((deltaTime < MIN_TICK_TIME) || (Iterations >= MaxSimulationIterations) || !HasValidData())
    {
        return;
    }

    if (UpdatedComponent->IsSimulatingPhysics())
    {
        UE_LOG(LogCharacterMovement, Log, TEXT("UCharacterMovementComponent::StartNewPhysics: UpdateComponent (%s) is simulating physics - aborting."), *UpdatedComponent->GetPathName());
        return;
    }

    const bool bSavedMovementInProgress = bMovementInProgress;
    bMovementInProgress = true;

    switch ( MovementMode )
    {
    case MOVE_None:
        break;
    case MOVE_Walking:
        PhysWalking(deltaTime, Iterations);
        break;
    case MOVE_NavWalking:
        PhysNavWalking(deltaTime, Iterations);
        break;
    case MOVE_Falling:
        PhysFalling(deltaTime, Iterations);
        break;
    case MOVE_Flying:
        PhysFlying(deltaTime, Iterations);
        break;
    case MOVE_Swimming:
        PhysSwimming(deltaTime, Iterations);
        break;
    case MOVE_Custom:
        PhysCustom(deltaTime, Iterations); // 《=====================================【这里】
        break;
    default:
        UE_LOG(LogCharacterMovement, Warning, TEXT("%s has unsupported movement mode %d"), *CharacterOwner->GetName(), int32(MovementMode));
        SetMovementMode(MOVE_None);
        break;
    }

    bMovementInProgress = bSavedMovementInProgress;
    if ( bDeferUpdateMoveComponent )
    {
        SetUpdatedComponent(DeferredUpdatedMoveComponent);
    }
}
完成 PhysCustom 函数。目标是调用 SafeMoveUpdatedComponent 进行角色移动设置
void UCwlMovement::PhysCustom(float DeltaTime, int32 Iterations)
{
    Super::PhysCustom(DeltaTime, Iterations);
    PhysClimbing(DeltaTime, Iterations);
}

void UCwlMovement::PhysClimbing(float DeltaTime, int32 Iterations)
{
    if (DeltaTime < MIN_TICK_TIME || GetOwnerRole() == ROLE_SimulatedProxy)
    {
        return;
    }

    Velocity = GetLastInputVector() * MaxCustomMovementSpeed;
    const FVector Adjusted = Velocity * DeltaTime;
    FHitResult Hit(1.f);
    SafeMoveUpdatedComponent(Adjusted, UpdatedComponent->GetComponentQuat(), true, Hit);
}
然后就能动了。
墙面贴合

趴在墙上的时候,没有修正角色朝向。如果这样角色向右挪一下就出去了。在tick的最后
void UCwlClimbComponent::PostUpdateClimbRotation(float Deltatime, const FHitResult& HitResultLowLevel)
{
// 墙面吸附问题
if (HitResultLowLevel.bBlockingHit)
{
if (ClimbState == ECwlClimbState::Climb)
{
FRotator ActorRotation = OwnerCharacter->GetActorRotation();
FRotator NewRot = FRotationMatrix::MakeFromX(OwnerCharacter->GetActorForwardVector() - HitResultLowLevel.Normal).Rotator();
ActorRotation.Yaw = NewRot.Yaw;
ActorRotation.Pitch = NewRot.Pitch;
ActorRotation.Roll = 0.f;
OwnerCharacter->SetActorRotation(FMath::RInterpTo(OwnerCharacter->GetActorRotation(), ActorRotation, Deltatime, 10.f));
}
}
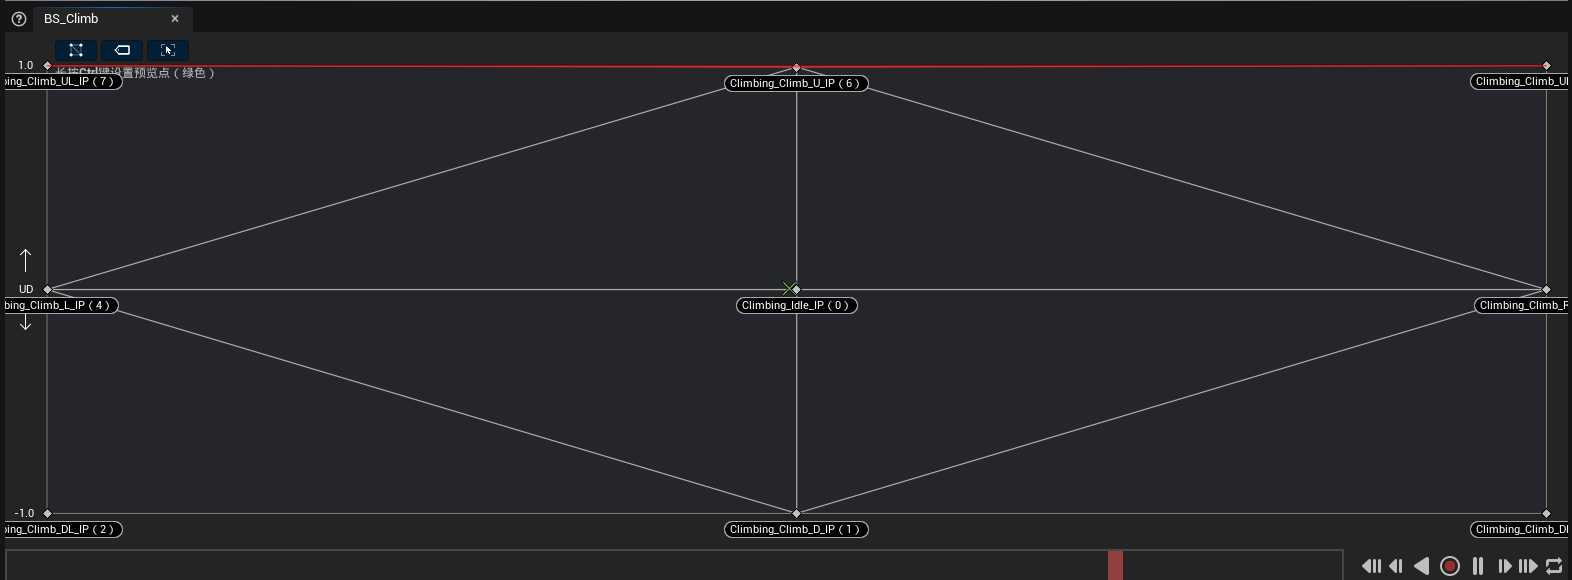
}攀爬循环动画
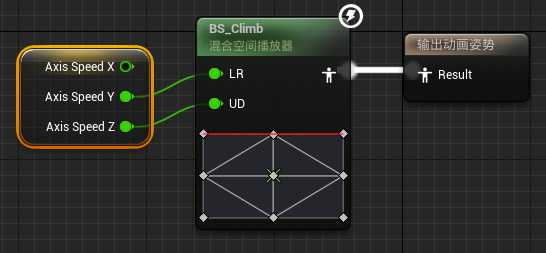
这个混合空间是一个各个方向攀爬动作的混合。
void UClimbAnimIns::CalculateClimbAxis(float InMaxSpeed)
{
    ACwlCharacter* OwnerCharacter = Cast<ACwlCharacter>(TryGetPawnOwner());
    if (OwnerCharacter == nullptr)
    {
        return;
    }

    FVector SpeedVector = OwnerCharacter->GetVelocity();
    FRotator CharacterRot = OwnerCharacter->GetActorRotation();

    SpeedVector = CharacterRot.UnrotateVector(SpeedVector);
    AxisSpeed.X = FMath::GetMappedRangeValueClamped(FVector2D(-InMaxSpeed, InMaxSpeed), FVector2D(-1.f, 1.f), SpeedVector.X);
    AxisSpeed.Y = FMath::GetMappedRangeValueClamped(FVector2D(-InMaxSpeed, InMaxSpeed), FVector2D(-1.f, 1.f), SpeedVector.Y);
    AxisSpeed.Z = FMath::GetMappedRangeValueClamped(FVector2D(-InMaxSpeed, InMaxSpeed), FVector2D(-1.f, 1.f), SpeedVector.Z);
}
根据速度向量,去掉角色旋转后的XYZ作为混合空间输入。速度上下限是MaxCustomMovementSpeed
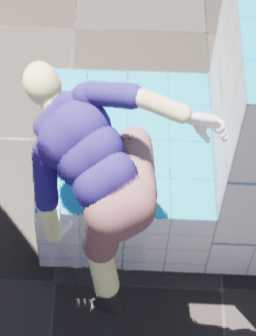
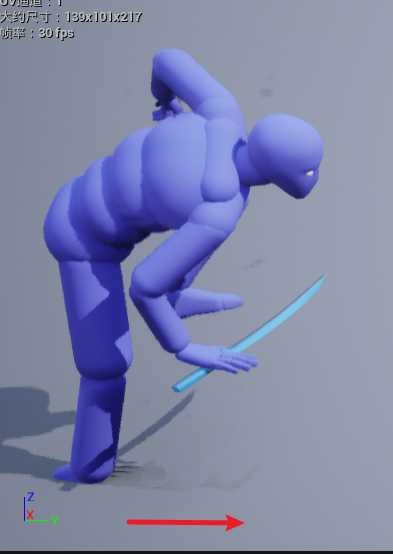
ALSv4的攀爬
接下来处理的是翻过障碍物,我们爬到顶上也可以用这个。显然ALSv4的细节比较好,直接用这个。
这里有个60是因为走斜坡的时候会一直触发爬上。简单处理
    else if (HitResultLowLevel.bBlockingHit && !HitResultHighLevel.bBlockingHit)
    {
        // 爬到顶了,或者翻过障碍物
        if (LowLevelTraceDistance <= 60.f) // 避免斜坡出问题
        {
            MantleCheck(GroundedTraceSettings, EDrawDebugTrace::Type::ForOneFrame);
        }
    }
ALS的攀爬指的是翻过障碍物,包括两个流程,检测和执行。和原版本的不同,我把检测接入到这里,并修改了他的三次检测流程。
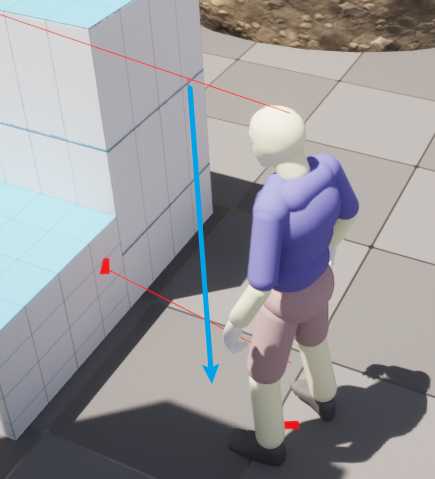
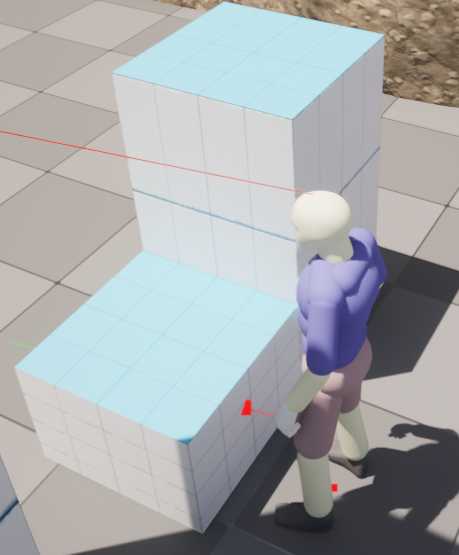
角色前方向下一次检测。寻找翻阅点。
void UCwlClimbComponent::MantleCheck(FCwlMantleTraceSettings TraceSettings, EDrawDebugTrace::Type DebugType)
{
    if (!IsComponentReady())
    {
        return;
    }

    // 【1】在角色前方从上向下打射线,找攀爬点
    FHitResult HitResultWallDown;
    FVector StartTraceLocation = OwnerCharacter->GetActorLocation() + OwnerCharacter->GetActorForwardVector() * 50.f;
    StartTraceLocation.Z += OwnerCapsuleComponent->GetScaledCapsuleHalfHeight();
    FVector EndTraceLocation = StartTraceLocation - OwnerCharacter->GetActorUpVector() * OwnerCapsuleComponent->GetScaledCapsuleHalfHeight() * 2.f;
    TArray<AActor*> ClimbingActorsToIgnore;
    UKismetSystemLibrary::LineTraceSingle(
        GetWorld(),
        StartTraceLocation,
        EndTraceLocation,
        ETraceTypeQuery::TraceTypeQuery1,
        false,
        ClimbingActorsToIgnore,
        DrawDebugTrace, HitResultWallDown, true);

    if (HitResultWallDown.bBlockingHit)
    {
        HitResultWallDown.Location.Z += OwnerCapsuleComponent->GetScaledCapsuleHalfHeight() + 2.f;
        ClimbingTracePoint = HitResultWallDown.Location;
        float MantleHeight = OwnerCapsuleComponent->GetScaledCapsuleHalfHeight() * 2.f - HitResultWallDown.Distance;

        ECwlMantleType MantleType = ECwlMantleType::LowMantle;
        if (MantleHeight > OwnerCapsuleComponent->GetScaledCapsuleHalfHeight() * 1.5f)
        {
            MantleType = ECwlMantleType::HighMantle;
        }
        else
        {
            MantleType = ECwlMantleType::LowMantle;
        }

        const FVector DownTraceLocation(HitResultWallDown.Location.X, HitResultWallDown.Location.Y, HitResultWallDown.ImpactPoint.Z);
        const FVector& CapsuleLocationFBase = GetCapsuleLocationFromBase(DownTraceLocation, 2.0f);
        const FTransform TargetTransform(OwnerCharacter->GetActorRotation(), CapsuleLocationFBase);

        FCwlComponentAndTransform MantleWS;
        MantleWS.Component = HitResultWallDown.GetComponent();
        MantleWS.Transform = TargetTransform;
        MantleStart(MantleHeight, MantleWS, MantleType);
    }
}
原版这里还多一次射线检测,这个地方是否能站一个人,我这里先不写
计算获得,攀爬高度,判断是高位攀爬,还是低位攀爬
开始MantleStart。这部分代码就抄ALSv4 C++里面的逻辑了
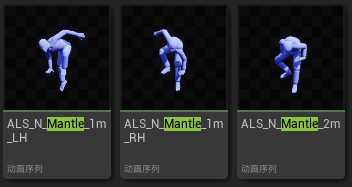
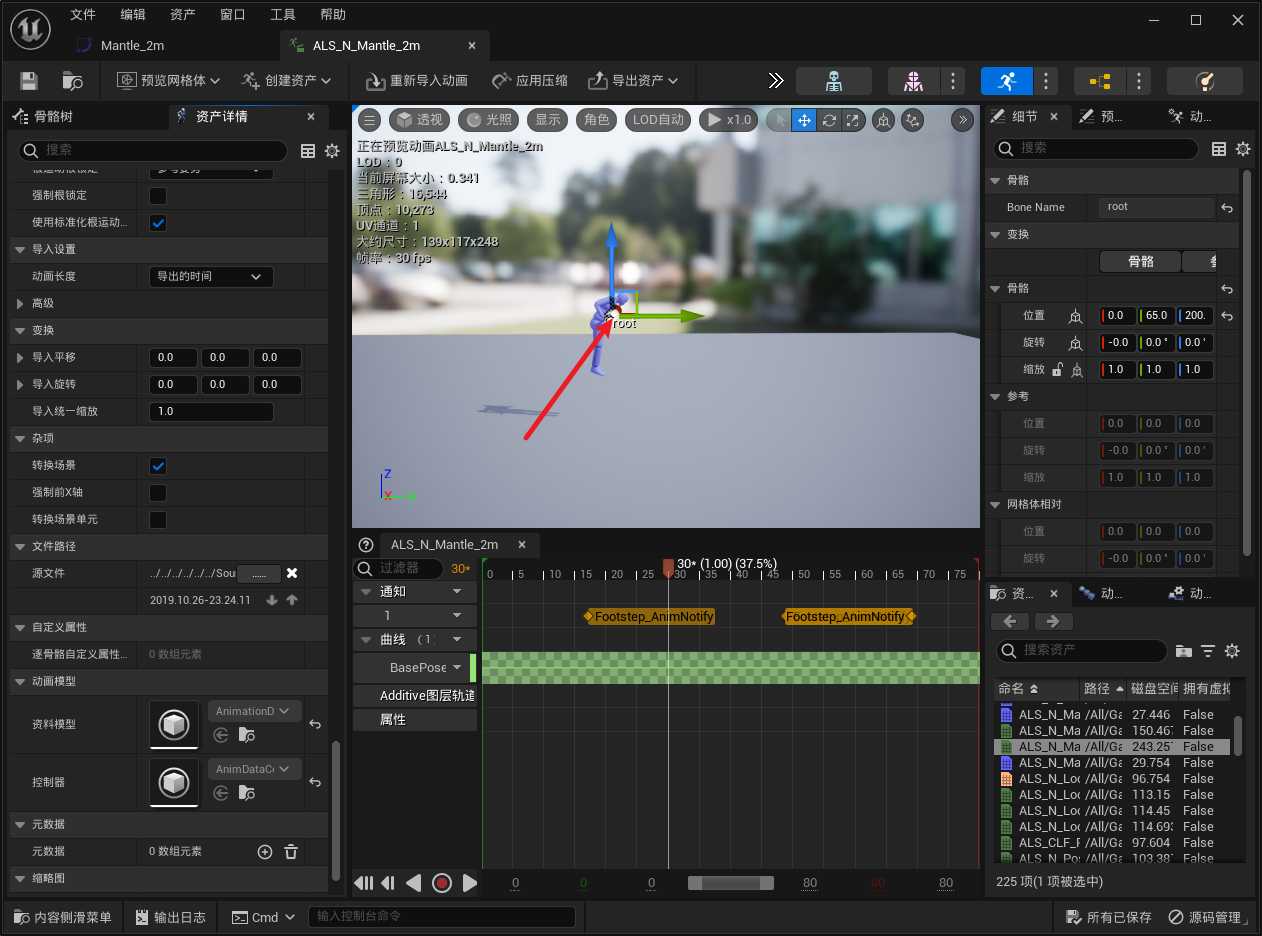
首先他有3个动画,基于此创建蒙太奇,1m低位攀爬左手,右手,和2m高位攀爬。
配表
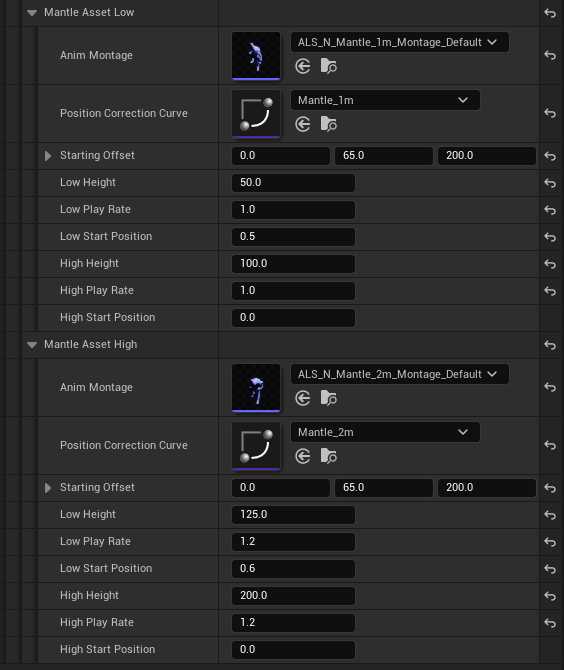
Anim Montage 准备播放的动画
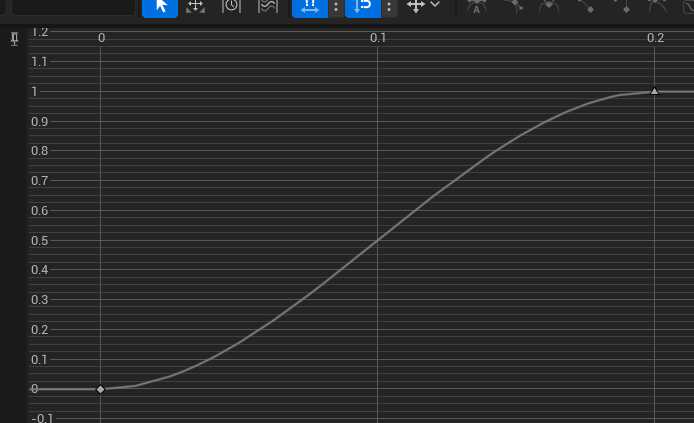
Position Correction Curve。攀爬曲线,用曲线位移来代替根运动,达到攀爬不同高度物体都能适配的效果。
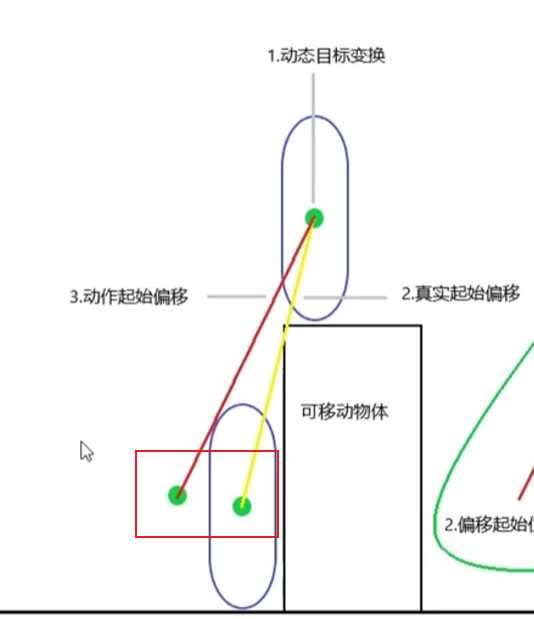
图片来自 94高级运动系统-攀爬系统:执行_哔哩哔哩_bilibili
Start Offset 的含义是如果我们直接,我们按照左图的路线插值,可能会穿模,需要按右图的方式插值。
其余配置是,有一个低攀爬的高度,一个高攀爬的高度。这个构成一个区间。当前攀爬的高度落在这个区间内。
又根据,Play Rate,Start Positon 区间,映射一个我们动画播放的速率。
    // Step 1: 根据配置计算参数
    const FCwlMantleAsset MantleAsset = GetMantleAsset(MantleType);
    check(MantleAsset.PositionCorrectionCurve)

    MantleParams.AnimMontage = MantleAsset.AnimMontage;
    MantleParams.PositionCorrectionCurve = MantleAsset.PositionCorrectionCurve;
    MantleParams.StartingOffset = MantleAsset.StartingOffset;

    MantleParams.StartingPosition = FMath::GetMappedRangeValueClamped<float, float>( // 攀爬动画播放的开始位置
        {MantleAsset.LowHeight, MantleAsset.HighHeight},
        {MantleAsset.LowStartPosition,MantleAsset.HighStartPosition}, MantleHeight);

    MantleParams.PlayRate = FMath::GetMappedRangeValueClamped<float, float>( // 攀爬动画播放的速率
        {MantleAsset.LowHeight, MantleAsset.HighHeight},
        {MantleAsset.LowPlayRate, MantleAsset.HighPlayRate}, MantleHeight);
// Step 2: 世界坐标转局部坐标
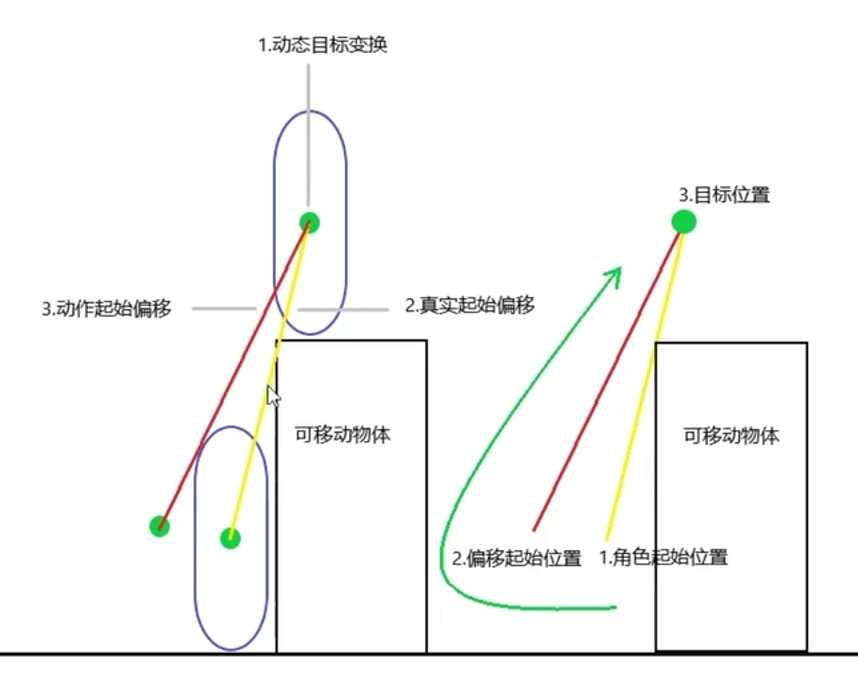
// 为了支持可移动的物体的攀爬(你爬的墙跑路了),
MantleLedgeLS.Component = MantleWS.Component;
MantleLedgeLS.Transform = MantleWS.Transform * MantleWS.Component->GetComponentToWorld().Inverse(); // Step 3: 计算攀爬目标和起始点的距离
MantleTarget = MantleWS.Transform; // 攀爬后,角色的Transform
MantleActualStartOffset = UCwlMathLibrary::TransformSub(OwnerCharacter->GetActorTransform(), MantleTarget);这里的 MantleActualStartOffse 就是黄色这一条, 角色减目标
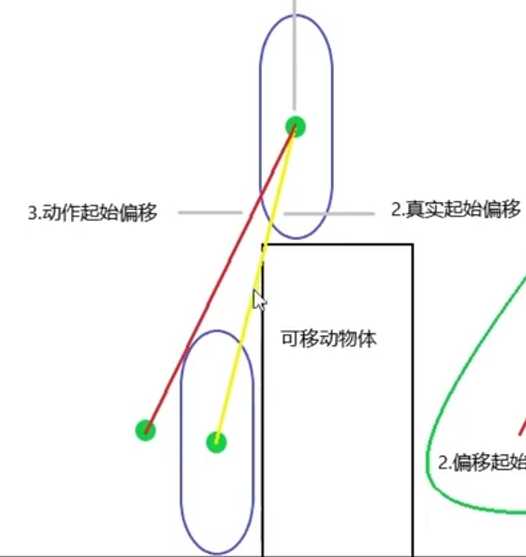
    // Step 4: 计算动画开始位置和目标的插值. 播放动作的时候防止穿模算的一个目标变换
    FVector RotatedVector = MantleTarget.GetRotation().GetForwardVector() * MantleParams.StartingOffset.Y;
    RotatedVector.Z = MantleParams.StartingOffset.Z;
    const FTransform StartOffset(MantleTarget.Rotator(), MantleTarget.GetLocation() - RotatedVector, FVector::OneVector);
    MantleAnimatedStartOffset = UCwlMathLibrary::TransformSub(StartOffset, MantleTarget);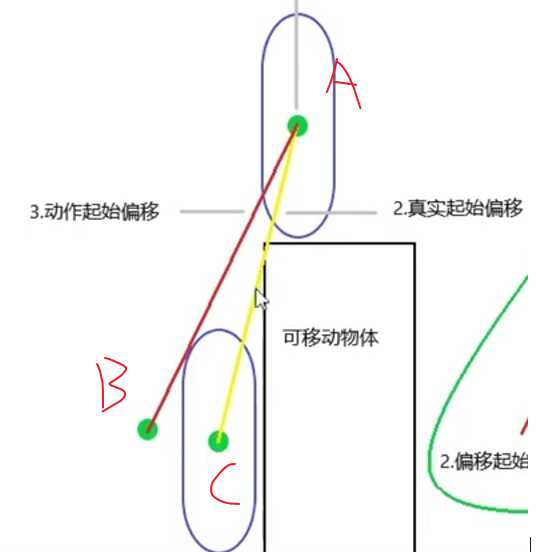
这里算的是红色
    // Step 5: 修改移动状态
    OwnerCharacter->GetCharacterMovement()->SetMovementMode(MOVE_None);
    OwnerCharacter->SetMovementState(ECwlMovementState::Mantling);

    // Step 6: Timeline 与插值
    float MinTime = 0.0f;
    float MaxTime = 0.0f;
    MantleParams.PositionCorrectionCurve->GetTimeRange(MinTime, MaxTime);
    MantleTimeline->SetTimelineLength(MaxTime - MantleParams.StartingPosition);
    MantleTimeline->SetPlayRate(MantleParams.PlayRate);
    MantleTimeline->PlayFromStart();

    if (MantleParams.AnimMontage && OwnerCharacter->GetMesh()->GetAnimInstance())
    {
        OwnerCharacter->GetMesh()->GetAnimInstance()->Montage_Play(
            MantleParams.AnimMontage, MantleParams.PlayRate, EMontagePlayReturnType::MontageLength, MantleParams.StartingPosition, false);
    }

    return true;
然后是修改移动状态,然后开启timeline。
这个timeline在构造函数构造,然后绑定,执行的时候调用 MantleUpdate,结束的时候调用 MantleEnd,并且还有一条配置的曲线 MantleTimelineCurve
const FName NAME_MantleEnd(TEXT("MantleEnd"));
const FName NAME_MantleUpdate(TEXT("MantleUpdate"));
const FName NAME_MantleTimeline(TEXT("MantleTimeline"));

UCwlClimbComponent::UCwlClimbComponent()
    : Super(),
      ClimbState(ECwlClimbState::None)
{
    PrimaryComponentTick.bCanEverTick = true;
    MantleTimeline = CreateDefaultSubobject<UTimelineComponent>(NAME_MantleTimeline);
    GroundedTraceSettings.InitGroundedTraceSettingsPreset();
    FallingTraceSettings.InitFallingTraceSettingsPreset();
}

void UCwlClimbComponent::BeginPlay()
{
    Super::BeginPlay();

    if (OwnerMovement.IsValid())
    {
        OwnerMovement->MaxCustomMovementSpeed = 200.f;
    }

    FOnTimelineFloat TimelineUpdated;
    FOnTimelineEvent TimelineFinished;
    TimelineUpdated.BindUFunction(this, NAME_MantleUpdate);
    TimelineFinished.BindUFunction(this, NAME_MantleEnd);
    MantleTimeline->SetTimelineFinishedFunc(TimelineFinished);
    MantleTimeline->SetLooping(false);
    MantleTimeline->SetTimelineLengthMode(TL_TimelineLength);
    MantleTimeline->AddInterpFloat(MantleTimelineCurve, TimelineUpdated);
}
然后我们看Update和 End
其中end比较简单,设置回walking状态就好。
void UCwlClimbComponent::MantleEnd()
{
    if (IsComponentReady())
    {
        OwnerCharacter->GetCharacterMovement()->SetMovementMode(MOVE_Walking);
    }

    SetComponentTickEnabledAsync(true);
}
然后是update
    // Step 1: 局部坐标转换世界坐标,处理那种墙跑了的情况。
    MantleTarget = UCwlMathLibrary::MantleComponentLocalToWorld(MantleLedgeLS);
// Step 2: 使用曲线更新攀爬过程中的唯一。
const FVector CurveVec = MantleParams.PositionCorrectionCurve->GetVectorValue(MantleParams.StartingPosition + MantleTimeline->GetPlaybackPosition());
const float PositionAlpha = CurveVec.X;
const float XYCorrectionAlpha = CurveVec.Y;
const float ZCorrectionAlpha = CurveVec.Z;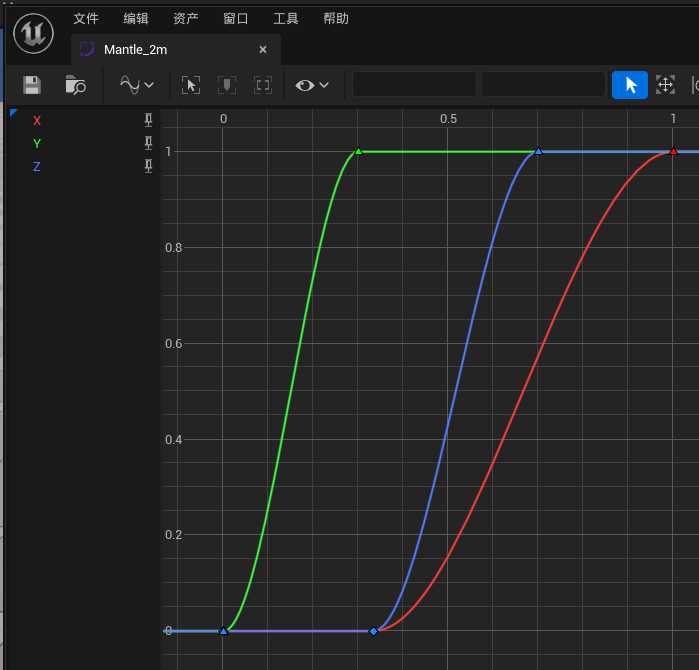
X曲线用来控制 0.3~1。表示这个动画根运动从0.3s开始,到1s运动到了目标位置
然后Z曲线表示是从0.3s开始,角色开始向上。同理Y是水平向的。
void UCwlClimbComponent::MantleUpdate(float BlendIn)
{
    if (!IsComponentReady())
    {
        return;
    }

    // Step 1: 局部坐标转换世界坐标,处理那种墙跑了的情况。
    MantleTarget = UCwlMathLibrary::MantleComponentLocalToWorld(MantleLedgeLS);

    // Step 2: 使用曲线更新攀爬过程中的位移,获取数据。
    const FVector CurveVec = MantleParams.PositionCorrectionCurve->GetVectorValue(MantleParams.StartingPosition + MantleTimeline->GetPlaybackPosition());
    const float PositionAlpha = CurveVec.X;
    const float XYCorrectionAlpha = CurveVec.Y;
    const float ZCorrectionAlpha = CurveVec.Z;

    // Step 3.1:水平方向上的插值
    const FTransform TargetHzTransform(
        MantleAnimatedStartOffset.GetRotation(),
        {MantleAnimatedStartOffset.GetLocation().X, MantleAnimatedStartOffset.GetLocation().Y, 0.f},
        FVector::OneVector);
    const FTransform& HzLerpResult = UKismetMathLibrary::TLerp(MantleActualStartOffset, TargetHzTransform, XYCorrectionAlpha);

    // Step 3.2 竖直方向上的插值
    const FTransform TargetVtTransform(
        MantleActualStartOffset.GetRotation(),
        {0.f, 0.f, MantleAnimatedStartOffset.GetLocation().Z},
        FVector::OneVector);
    const FTransform& VtLerpResult = UKismetMathLibrary::TLerp(MantleActualStartOffset, TargetVtTransform, ZCorrectionAlpha);

    // Step 3.3 混合水平和竖直方向上的插值
    const FTransform ResultTransform(
        HzLerpResult.GetRotation(),
        {HzLerpResult.GetLocation().X, HzLerpResult.GetLocation().Y, VtLerpResult.GetLocation().Z },
        FVector::OneVector);

    // Step 3.4 相对变换+目标变换,获得最终的变换。然后向 Target插值
    const FTransform& ResultLerp = UKismetMathLibrary::TLerp(UCwlMathLibrary::TransformAdd(MantleTarget, ResultTransform), MantleTarget, PositionAlpha);

    // ...
}
这一段需要一个过渡。用到上面0.2s的曲线
    // Step 4 初始位置插值。
    const FTransform& LerpedTarget = UKismetMathLibrary::TLerp(UCwlMathLibrary::TransformAdd(MantleTarget, MantleActualStartOffset), ResultLerp, BlendIn);

    // Step 5: 更新角色的位置和旋转
    OwnerCharacter->SetActorLocationAndTargetRotation(LerpedTarget.GetLocation(), LerpedTarget.GetRotation().Rotator());
手部IK
参考资料:
- ALSv4 原版
- ALSv4 C++版本 ALS-Community https://github.com/dyanikoglu/ALS-Community
- 攀爬系统 https://www.aboutcg.org/courseDetails/1269/introduce
- UE5 Climb Movement实践 https://zhuanlan.zhihu.com/p/597785513
- 一篇讲塞尔达攀爬系统的,找不到了。。。
- 动画素材,虚幻商城 Climb Anim Set